Introduction
The Oracle Enterprise Manager 11g Fusion Middleware Control application offers a number of ADF performance monitor and configuration options. These and more are described in the Oracle® Fusion Middleware Administrator's Guide for Oracle Application Development Framework 11g Release 1 (11.1.1) manual. This FAQ will guide you through the installation and configuration of Fusion Middleware Control on the standalone WLS that ships along with JDeveloper 11g.
Main Theme
In order to install Fusion Middleware Control, you will need to download both the Repository Creation Utility and the Application Development Runtime installation packages from the Oracle Fusion Middleware 11gR1 Software Downloads. Look for them under the Required Additional Software section.
Installation of the Repository Creation Utility
Once you are done with these downloads, unzip them and start first with the installation of the Repository Creation Utility by running the rsu.bat installation script. It can be found in the rcuHome\BIN folder. Click Next in the Welcome page and select Create on the Create Repository screen to create a new repository.
In the Database Connection Details page specify the necessary database details where the repository schemas will be created. For Oracle databases, Oracle 10g version 10.2.0.4.0 or higher and 11g version 11.1.0.7.0 or higher is required.
In the Select Components page, specify a schema prefix - defaults to DEV, and select the schemas to be installed. At a minimum, install the schemas for AS Common Schemas, WebLogic Communication Services and SOA and BPM Infrastructure.
In the pages that follow, specify the schema passwords and the names of the tablespaces to be created. Finally, click Create in the Summary page to proceed with the creation of the infrastructure schemas.
Upon completion of the schema creation process, a summary screen will be shown where you can verify the successful creation of each component selected earlier.
Installation of the Application Development Runtime
Now that the repository infrastructure schemas are installed, proceed with the installation of the Application Development Runtime. Prior to its installation, I strongly suggest that you make a backup of your middleware home directory, just in case you need to restore it at anytime in the future. Start the installation of the Application Development Runtime by running the setup.exe installation program in the Disk1 folder. Make sure that you specify the -jreLoc argument and the location of the JRockit Java Runtime otherwise it won't start.
The Welcome screen will be displayed upon successful startup of the installation. Click Next to navigate to the Prerequisite Checks page.
Ignore the Checking service pack error since we will specify the correct middleware home directory in the next page. In the Specify Installation Location page, specify the middleware home directory where you installed the standalone WLS that ships along with JDeveloper. This is usually the middleware home where JDeveloper is installed.
Click Install in the Installation Summary page to proceed with the installation and ensure that the installation completes smoothly.
In the Installation Complete page click Finish to exit from the installation program.
WLS configuration using the Fusion Middleware Configuration Wizard
Once the installation is complete, observe the new group of shortcuts called Oracle Application Developer 11g - Home 1 that was created by the installation program.
From there, select Configure Application Server to configure the Fusion Middleware Control on the standalone WLS. In the Welcome page select Create a new WebLogic domain to create a new domain configured specifically with Enterprise Manager Fusion Middleware Control and click Next.
In the Select Domain Source page ensure that both the Oracle Enterprise Manager and the Oracle JRF products are selected and click Next.
In the Specify Domain Name and Location page, enter the name and location of the domain.
In the next pages specify the administrator account credentials and select the domain startup mode and JDK. In the Select Optional Configuration page, select the Administration Server, Managed Servers, Clusters and Machines and Deployments and Services options.
In the Configure the Administration Server page accept the defaults and click Next. In the Configure Managed Servers page, add a managed server as shown below.
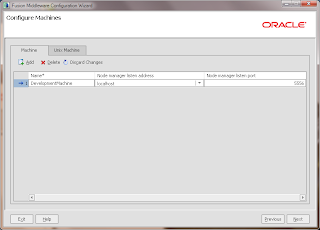
Skip the Configure Clusters page and in the Configure Machines page add your development machine as a WLS machine.
Assign the administration and the managed servers to the machine you specified in the Assign Servers to Machines page as shown below.
In the Target Deployments to Clusters or Servers page make sure that the ADF libraries are applied to both the administration and the managed servers as shown below.
Leave the selections as they are in the Target Services to Clusters to Servers page and verify your selections in the Configuration Summary page. Then click Create to create the domain. The Fusion Middleware Configuration Wizard will then proceed with the creation of the domain.
Node Manager configuration
Once the domain is created, one more thing that needs to be configured is the Node Manager. The node manager configuration file can be located in the %MIDDLEWARE_HOME%\wlserver_10.3\common\nodemanager directory but it does not exist until the node manager runs for the very first time. So, select the Node Manager shortcut from the Start menu and run it. Then exit from the node manager by closing its window.
The nodemanager.properties configuration file should have been created now in the directory mentioned above. Open the file and change the line that reads
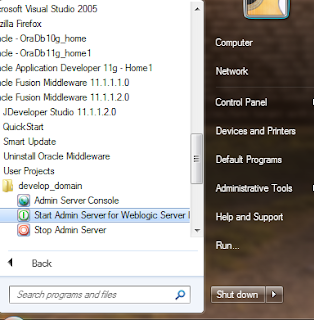
Now start both the Node Manager and the Administration Server. The administration server can be started by selecting the Start Admin Server for Weblogic Server Domain shortcut under the User Projects for the domain you just created.
Fusion Middleware Control
The Enterprise Manager 11g Fusion Middleware Control can be started by navigating to the http://localhost:7001/em URL. Login as weblogic/weblogic1 to get access to it.
To verify that a managed server can be started successfully, navigate to the WebLogic Domain | %domain% | %managed_server% in the tree view and from the WebLogic Server menu select Control | Start Up to start it.
The following dialog should be displayed once the managed server is started successfully.
Finally, one last thing that needs to be done is to apply the JRF template to enable some of the features of the Enterprise Manager. So, with your managed server selected in the tree view, click on the Apply JRF Template button to apply it.
Once applied, you should see the successful confirmation shown below.
Deploy and Monitor
Now you can deploy your applications and monitor them with the Fusion Middleware Control. If you haven't done yet, setup a connection in JDeveloper and deploy your application as described in FAQ #3 - How to deploy an ADF application on a standalone WebLogic server directly from JDeveloper. Then from the Fusion Middleware Control, under the Farm_%domain% | Application Deployments select the application deployed to view its specific details (Summary, Entry Points, Web Services, Modules, Response and Load and Most Requested).
Use the Application Deployment | ADF menu to monitor and configure ADF-specific functionalities of your application.
Conclusion
Once installed, you can use Enterprise Manager 11 Fusion Middleware Control for your development deployments on your local standalone WLS to monitor and configure various aspects of your application during the development process.
Until the next time, keep on JDeveloping!
References
Oracle® Fusion Middleware Administrator's Guide for Oracle Application Development Framework 11g Release 1 (11.1.1)
Oracle® Fusion Middleware Administrator's Guide 11g Release 1 (11.1.1)
Notes
There are a few issues that I run into during the installation that I am still unable to figure out. I am suspecting that they are related to library conflicts. Any input towards their resolution is highly appreciated.
- When I select ADF Performance from the ADF menu, I get no data and the following exception in the server log console: java.lang.IllegalStateException: The expression "#{bindings.genRegion.regionModel}" (that was specified for the RegionModel "value" attribute of the region component with id "genRegion_dlg") evaluated to null.
- When I select Configure ADF Business Components from the ADF menu, I get a Configuration settings are unavailable because %application% is down message and the following warning in the log console:
 |  |


Interesting post Nick - I haven't tried installing FMC into a JDev WLS installation before but could see how it could be handy.
ReplyDeleteJust one thought: presumably if you're not using SOA, e.g. if you're just developing ADF apps (without MDS), you won't need to run RCU to create a repository?
Simon
Simon,
ReplyDeleteThe FMC needs a repository, so you do need RCU.
John
Hi John,
ReplyDeleteHave you found the cause of the error "unavailable because %application% is down message".
I also happen to have the same issue with WLS10.3.2 in combination with FMW. With WLS10.3.3 I dont have this problem.
Regards,
Wing