This and the next FAQ will go over setting up a WebLogic cluster consisting of two Managed Servers running on a separate physical machine each. For the case of this example, each machine is running a different Linux distribution.
Main Theme
A WebLogic cluster could be setup in a number of different configurations, a WebLogic Domain in fact could be comprised of a combination of WebLogic Clusters and Managed Servers. The following is an extract from section 2 - Understanding WebLogic Server Clustering of the Oracle® Fusion Middleware Using Clusters for Oracle WebLogic Server 11g Release 1 (10.3.3) documentation:
"A WebLogic Server cluster consists of multiple WebLogic Server server instances running simultaneously and working together to provide increased scalability and reliability. A cluster appears to clients to be a single WebLogic Server instance. The server instances that constitute a cluster can run on the same machine, or be located on different machines. You can increase a cluster's capacity by adding additional server instances to the cluster on an existing machine, or you can add machines to the cluster to host the incremental server instances. Each server instance in a cluster must run the same version of WebLogic Server."
There are also several methods for setting up the clustered domain, namely using the Fusion Middleware Configuration Wizard, the Administration Console, the wlst command line utility and even programmatically. In this example we will combine the first three: we will create the domain using the Configuration Wizard and setup the domain cluster using the Administration Console and the wlst utility.
Briefly the steps involved in setting up the cluster are:
1. Install WebLogic on both physical machines
2. Create the WebLogic Domain on one physical machine
3. Configure the domain by adding Managed Servers and Machines on one physical machine
4. Copy the domain file structure to the other physical machine and enroll it to the WebLogic Domain
5. Ensure that both WebLogic Machines are operational
6. Create and configure the Cluster
7. Ensure that the Cluster is operational
1. Install WebLogic on both physical machines
The same exact version of WebLogic must be installed on both physical machines. Also, WebLogic must be installed on the same Middleware Home in both machines. This is necessary since we will be copying the domain file structure from one physical machine to the other - step 4 above.
Start by going to the Oracle WebLogic downloads page and download the latest version of WebLogic for Linux. At the writing of this, this page can be accessed by clicking here.

The 32-bit Linux WebLogic version 10.3.3. file that is downloaded is called wls1033_oepe111150_linux32.bin. For installing and administering this installation create a weblogic Linux user account and use it to login and perform the installation. Make sure that the maximum number of open files is set to 4096 for the user account.
Ensure that the wls1033_oepe111150_linux32.bin has execute permission and start the installation by typing ./wls1033_oepe111150_linux32.bin. The installation will self-unpack and present the Welcome page.

On the Choose Middleware Home Directory page accept the default Oracle/Middleware under the /home/weblogic and press Next.

On the Register for Security Updates page click Next. On the Choose Install Type page select Custom and click Next. On the Choose Products and Components page you may deselect Oracle Enterprise Pack for Eclipse and click Next. Accept the defaults on the JDK Selection page - both the Java and JRockit SDKs are selected - and click Next. On the Choose Product Installation Directories page accepts the defaults and click Next.

Verify the installation parameters on the Installation Summary page and press Next to proceed with the installation.
Now proceed with the installation of WebLogic using the exact same installation package and the steps outlined above on the other machine.

Ensure that in page Choose Middleware Home Directory the same Middleware Home is specified. In this case we will accept the default Oracle/Middleware under the weblogic user's home directory /home/weblogic.

2. Create the WebLogic Domain in one physical machine
Now, having completed the WebLogic installations on both machines, we can proceed with the creation of the WebLogic Domain. We will do this only on one of the two machines.
Start the Fusion Middleware Configuration Wizard utility - it is called config.sh and is located in the wlserver_10.3/common/bin directory under the Middleware Home (/home/weblogic/Oracle/Middleware for our installation) and on the Welcome page select Create a new WebLogic domain.

At this point accept the default products on the Select Domain Source page and click Next. On the Specify Domain Name and Location page specify the name and location of the domain. For this example we have called it clusteredDomain. On the Configure Administrator User Name and Password page specify the weblogic administrator password. Accept the appropriate startup mode and JDK on the Configure Server Start Mode and JDK page and click Next. On the Select Optional Configuration page select Administrator Server only. We will create the Managed Servers, Machines and Clusters later on using the Administration Console.

On the Configure the Administration Server page you can accept the defaults for the administration server Name and Listen port and click Next. Verify your selections on the Configuration Summary page and when ready click on Create to proceed with the creation of the domain.

The Configuration Wizard proceeds with the creation of the domain under the path specified, which defaults to user_projects/domains under the Middleware Home. Once the domain is created successfully, we can start it by running the startWebLogic.sh script in the user_projects/domains/clusteredDomain. Verify that the domain is started successfully by observing the logs in the terminal window.

3. Configure the domain by adding Managed Servers and Machines in one physical machine
With the domain running we can proceed with the creation of the Managed Servers and Machines using the WebLogic Administration Console. So, start your browser and go to the Administration Console by specifying its address as: http://machine1:7001/console ,where machine1 is the ip address or host name of the machine that you used in step 2 above to create the Administration Server. This should display the Administration Console login form.

Enter the server administration name and password you specified in step 2 when creating the domain - username defaults to weblogic - and click Log In to login.
The first thing that we need to do now is to create the managed servers. Using the Domain Structure tree navigate to Environment and then Servers. On the Summary of Servers screen Configuration tab click on the New button to create a new Managed Server.

On the Create a New Server screen specify the Server Name, Server Listen Address and Server Listen Port. For the Server Listen Address specify the address of the first physical machine. You can click Next to verify your input and finally Finish to proceed with the creation of the Managed Server.

The Administration Console proceeds with the creation of the server. When done displays a success message in the Messages area and the server is shown in the Summary of Servers table in a SHUTDOWN state.

Repeat the steps above to create the Managed Server sunning on the other physical machine. Make sure that you specify the Server Listen Address of the other physical machine.

Now that the Managed Servers have been created we will proceed with the creation of the WebLogic Machines - one for each physical machine - and assign the Managed Servers to them.
Using the Domain Structure tree navigate to Environment and then Machines. On the Summary of Machines table click on the New button to create a new WebLogic Machine.

On the Create a New Machine page specify the name of the first machine and click OK to create the Machine.

A success message in the Messages should indicate the successful creation of the Machine and the Machine will be available in the Summary of Machines table.

Now, click on the newly created Machine and then on the Node Manager tab under the Configuration tab. The node manager will be used on each physical machine to start the Managed Servers. On this tab we need to properly configure the node manager parameters. Make sure that the Type is set to Plain and that the Listen Address corresponds to the ip address of the physical machine where this Machine's node manager is running. You can leave the port to the default 5556. Don't forget to click on the Save button to save your settings.
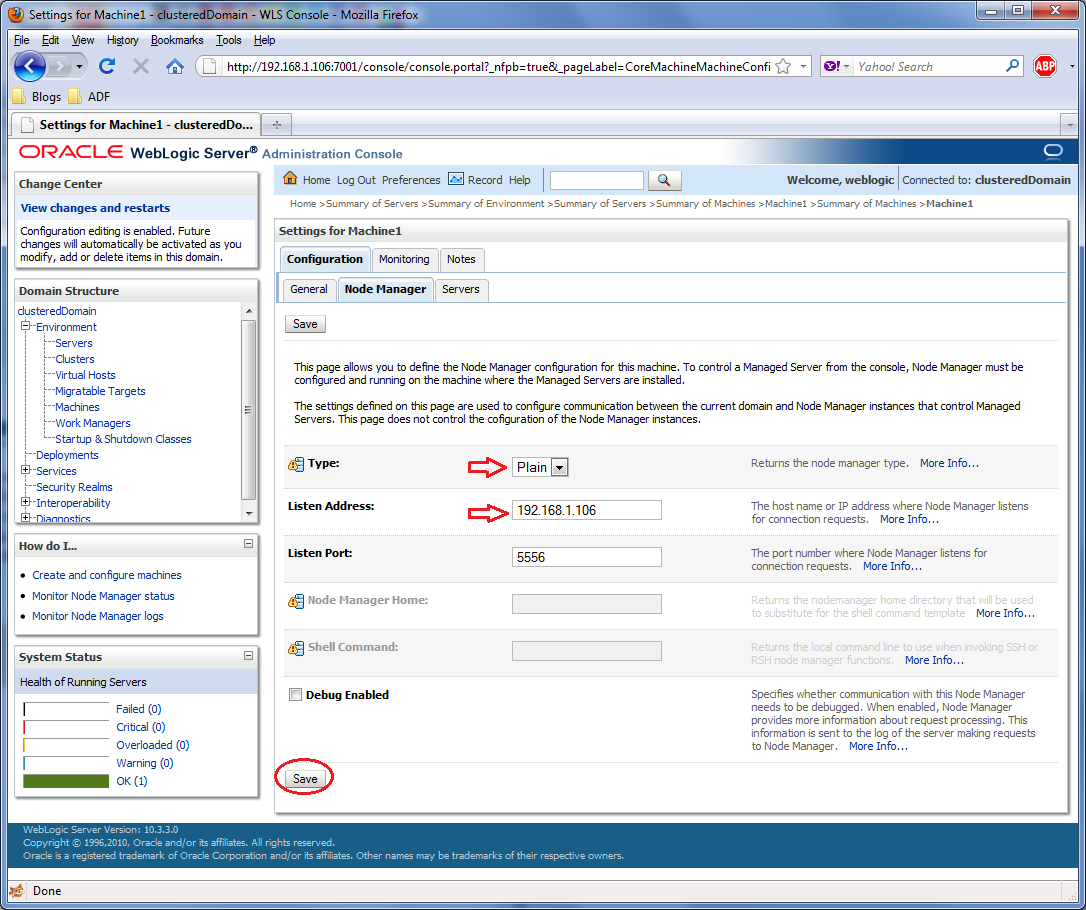
Verify that your settings were set successful by observing the Messages area.
Now you will need to assign the appropriate Managed Server to the Machine. You do this by clicking on the Servers tab under the Machine Configuration tab and then the Add button.

In the Add a Server to Machine page ensure that the appropriate Managed Server - the one that corresponds to this Machine - is selected in the Select a server choice list. Click Next or Finish to proceed with the server assignment.

The Managed Server should be assigned successfully and should be displayed in the Servers table for this Machine.

Now repeat the steps above to create a WebLogic Machine for the second physical machine. Make sure that you configure the Machine correctly and assign the appropriate Managed Server to it.

Now with the WebLogic Machines created and configured we can start the node manager on the machine. Remember that we are still working on the same machine where we run the Configuration Wizard in the first place. It can be started by running the startNodeManager.sh script in the wlserver_10.3/server/bin directory under the Middleware Home. Before starting it, go over the start-up parameters specified in the nodemanager.properties configuration file in the wlserver_10.3/common/nodemanager directory and verify that it is not configured for SSL by ensuring that the SecureListener parameter is set to false. Once started the terminal window should indicate that the node manager is running and listening to the port configured.

To verify that the node manager is reachable by the WebLogic Machine, return to the Machines page in the Administrator Console and on the Summary of Machines table click on the first Machine - Machine1 in this case the one we are currently configuring. Click on the Monitoring tab and observe in the Node Manager Status tab that the node manager Status is Reachable.

Conclusion
This concludes this first part of setting up the cluster. On the next and final part we will continue with the setup of the second physical machine, verify that both WebLogic Machines are operational, create, configure and start the WebLogic cluster.
Until the next time, keep on JDeveloping!
 |  |