Monday, May 24, 2010

FAQ #22 - How to get started with SOA Suite 11g R1, Pt. 1

Introduction

In this series of posts, we will examine some basic steps of getting started with Oracle SOA Suite. This first part deals with the software installation and configuration on a simple development environment running on Windows. Installing SOA Suite 11g is a series of steps that include a database installation, installation of WLS, installation of the SOA Suite software itself, creation of the repository and finally configuration. We will install the latest available version today, SOA Suite 11gR1 Patch Set 2 (11.1.1.3.0). Since SOA Suite 11gR1 Patch Set 2 (11.1.1.3.0) is a point release, installing it also requires that first SOA Suite 11g R1 Patch Set 1 (11.1.1.2.0) be installed and then upgrading it.

Main Theme

To install SOA Suite 11g R1 Patch Set 2 (11.1.1.3.0) follow the steps below in order:

1. Installation of WLS 10.3.3


The first step of installing SOA Suite would be to install WebLogic 10.3.3. It can be downloaded from the Oracle Fusion Middleware 11gR1 Software Downloads page. Start the installation of WLS by executing wls1033_win32.exe. Click Next on the first page and on the Choose Middleware Home Directory select Create a new Middleware Home. Enter the new middleware home directory.


On the Register for Security Updates page you can choose not to receive security updates and safely ignore the warning message that is displayed.


On the Choose Install Type you can select Typical.


Verify or change the installation directories on the Choose Product Installation Directories page.


In the Choose Shortcut Location page select "All Users" Start Menu folder.


Verify your installation selections on the Installation Summary page and click Next to start the installation.


2. Installation of SOA Suite 11g R1 Patch Set 1 (11.1.1.2.0)

You can download SOA Suite 11g R1 Patch Set 1 from the Oracle Fusion Middleware 11gR1 Software Downloads page. Once downloaded, unzip the ofm_soa_generic_11.1.1.2.0_disk1_1of1.zip file into a temporary directory and start the installation by going to the Disk1 folder and typing Setup -jreLoc %JROCKIT_JRE%, where %JROCKIT_JRE% is the location of the JRockit JRE.

Click Next on the Welcome page. After the successful checks for the necessary prerequisites on the Prerequisite Checks page click Next. On the Specify Installation Location ensure that you select the middleware home where you previously installed WLS 10.3.3, specify the home directory - defaults to Oracle_SOA1, and click Next.


On the Installation Summary page verify the installation selections and press Install to start the installation.


When the installation completes, click Next and finally Finish on the Installation Complete page.

3. Installation of SOA Suite 11g R2 Patch Set 2 (11.1.1.3.0)


Download SOA Suite 11g R2 Patch Set 2 from the Oracle Fusion Middleware 11gR1 Software Downloads page. Once downloaded, unzip the ofm_soa_generic_11.1.1.3.0_disk1_1of1.zip file in a temporary directory and start the installation by going to the Disk1 directory and typing Setup -jreLoc %JROCKIT_JRE%, where %JROCKIT_JRE% is the location of the JRockit JRE.

Click Next on the Welcome page. On the Specify Installation Location page middleware home and middleware home directory where you previously installed the SOA Suite 11g R1 Patch Set 1.


On the Installation Summary screen click Install to start the installation.


When the installation is complete click Next on the Installation Progress page and finally Finish on the Installation Complete screen.


4. Installing the Repository


Download the RCU Repository Creation Utility 11.1.1.3.0 from the Required Additional Software section of the Oracle Fusion Middleware 11gR1 Software Downloads page. Once downloaded, unzip the ofm_rcu_win_11.1.1.3.0_disk1_1of1.zip file in a temporary directory. Start the installation of the repository by going to the rcuHome\BIN directory and running the rcu.bat batch file.

On the Create Repository page select Create.
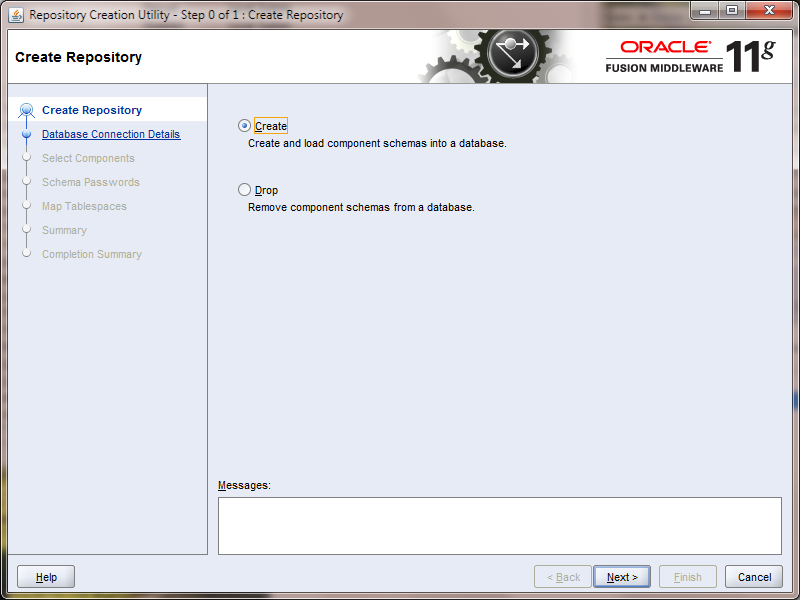

Specify the database information in the Database Connection Details page and click Next.


RCU will start a series of prerequisite checks and inform you of the status.
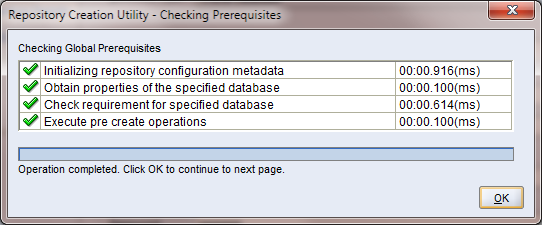

Click OK on the Checking Prerequisites dialog to proceed. On the Select Components page, select Create a new Prefix and enter a prefix or keep the default. Select the components to install from the Component tree and click Next.


RCU will proceed with checking the specific component prerequisites based on the components that you have selected. Verify that the prerequisites are all met and click OK in the Checking Prerequisites dialog.


On the Schema Passwords page, enter the passwords for the schemas and click Next.


Verify the tablespaces that will be created on the Map Tablespaces page and click Next.


After clicking OK on the warning regarding the creation of non-existing tablespaces, RCU will proceed with creating the necessary tablespaces. Once the tablespaces are created, click OK on the Creating Tablespaces dialog to proceed.


On the Summary page verify your selections and click Create to proceed with the creation of the repository.


RCU will now proceed creating the selected schemas. When done, a Competition Summary dialog is displayed.


5. Configuring SOA Suite 11g

Before using SOA Suite 11g, it must be configured. To start the configuration select Configure Application Server from the newly created Oracle SOA 11g - Home1 Start Menu.


This will start the Fusion Middleware Configuration Wizard. On the Welcome page select Create a new WebLogic domain and click Next.


On the Select Domain Source page select the products that will be supported by the domain and click Next.


Enter the domain name on the Specify Domain Name and Location screen and click Next.


On the Configure Administrator User Name and Password page enter the name and password of the domain administrator user and click Next. Select the domain startup mode and JDK on the Configure Server Start Mode and JDK screen and click Next.

On the Configure JDBC Component Schema page enter the SOA repository database connection settings.


If your connection details are correct, you should see a success check mark on the Test Component Schema screen.


On the Select Optional Configuration screen click on Administration Server and on Managed Servers, Clusters and Machines.


You can choose the default administration server name on the Configure the Administration Server page and click Next. On the Configure Managed Servers page, enter the names of managed servers.


Do not configure any clusters on the Configure Clusters page. On the Configure Machines page accept the defaults and click Next.


Accept the default configuration on the Assign Servers to Machines page and click Next.


On the Configuration Summary page verify your selections and click Create to start with the domain creation process. When all is done, you should see a Domain Created Successfully! screen.


This concludes the installation of SOA Suite 11g.

Conclusion

In this part we discussed how to install SOA Suite 11g R1 Patch Set 2 (11.1.1.3.0). In subsequent parts we will get into the details of how to use JDeveloper to develop SOA applications.

Until the next time, keep on JDeveloping!


Thursday, May 13, 2010

Extension Intermission #1 - Subversion Monitor, Extension to monitor a Subversion repository

Introduction

There are at least a couple of utility programs that will let you monitor the commit activity on a Subversion repository both running on the Windows platform. Here is a third one, appropriately baptized Subversion Monitor, developed to run - of course - as a JDeveloper extension.

Main Theme

Installation

To install Subversion Monitor, first download the SubversionMonitor.zip file from the link below and save it somewhere in your computer. Then start JDeveloper - it was developed and tested with the Studio Edition Version 11.1.1.2.0 version of JDeveloper - and select Help | Check for Updates... to bring up the Check for Updates dialog. Chose Install From Local File and then click on the Browse... button to browse for the SubversionMonitor.zip file you just downloaded.


Click Next to proceed with the installation and in the Summary page click Finish. JDeveloper needs to re-start to finalize the installation, so in the Confirm Exit dialog that is presented click Yes.

Setting up

Upon re-starting, JDeveloper should load the Subversion Monitor extension and notify you that it is unable to connect to the Subversion repository.


This is OK. You will need to setup the Subversion repository url along with your Subversion credentials. To do this, select Preferences from the Tools menu to bring up the Subversion Monitor Preferences dialog.


Enter your Subversion repository URL, username and password in the dialog and uncheck the Disable Monitoring check-box. This will enable a timer to notify you when there is a new revision in your repository. Set the timer delay appropriately with the Monitor Repository Every (seconds) spinner. When done, click OK to see Subversion Monitor in action!


You can bring up the notification balloon on demand anytime by clicking on the team icon on the status bar. To disable the timer monitor, check the Disable monitoring check-box on the balloon. You can review the latest revisions by clicking anywhere else on the notification balloon. Doing so will bring up the Revisions editor.


As you click on the revision in the Revisions table, the files that were changed for that revision will be displayed in the Revision Files panel at the bottom. The M flag in front of the file is the action on the file and it can be any of the M(odified), A(dded), D(eleted). You can set the number of top revisions to view using the Maximum Revisions to View in Editor spinner in the preferences page.

As a final note, Subversion Monitor does not require that you configure versioning for Subversion in JDeveloper.


[Amended on May 17th, 2010]
Subversion Monitor is now available directly from the Open Source and Partners Extensions of the JDeveloper Help | Check for Updates... feature!


Conclusion

Enjoy monitoring your colleagues as they commit their changes using Subversion Monitor! Your comments, suggestions (, bug reports) are welcomed.

Until the next time, keep on JDeveloping!


Extension

SubversionMonitor.zip


Sunday, May 2, 2010

FAQ #21 - How to passivate/activate ADF Application Module class instance variables

Introduction

If you are using instance variables in your Application Module (AM) class, as part of some algorithm in your application and you expect these variables to persist from one user request to another so that the algorithm works as expected, passivation (and activation) support for these variables must be added. This FAQ will show you how to do this and at the same time build a "mini sub-framework" to avoid duplication of the basic passivation-activation code that you must write for all your AMs in your project.


Main Theme

Some Introductory Information

Application Module pooling is the process of acquiring an AM from and releasing it back to a pool. This pool of AMs contains a limited number of AMs defined in a configuration file. When all AMs have been associated with user sessions, an already-used AM must be re-used. For this to happen, the existing data associated with the AM must be saved. The passivation process saves information used by the AM into the passivation store -  usually a database, while the activation process does exactly the opposite, restores the state of the  AM from the passivation store. The information is saved as an XML document. Take a look at FAQ #14 - How to test an Application Module for activation-safe in ADF 11g for additional information regarding the passivation and activation processes.

You can add custom passivation and activation logic in your AM class by overriding the ApplicationModuleImpl methods passivateState() and activateState() respectively. The passivateState() method should create the necessary XML elements for each AM instance variable that you need to passivate. The activateState()  method should detect the specific XML elements that identify the instance variables in the passivated XML document and restore them back into the instance variables.


A "mini sub-framework" for passivating/activating Application Module instance variables

If you are using multiple AMs, you can avoid code duplication of this basic implementation of the passivateState() and activateState() methods by putting it in a base AM class. Then derive all of your other AMs from this base AM. The base AM class can then provide activation/passivation "triggers" to which the derived AMs can respond. The implementation of passivateState()  in the base AM should look like this:


As you can see, after calling super.passivateState() to allow the framework to do its own processing, we call onStartPassivation() to signal derived AMs that a passivation process is taking place. Derived AMs should override onStartPassivation() in order to provide a list of the identifiers - each identifier tied to a specific instance variable - to be passivated. Below is an example implementation of onStartPassivation() by a derived AM class. 


In this case a single passivation identifier call EMPLOYEE_LIST_ID is returned to indicate a list of Employees class instance variable.

passivateState() then loops for all passivation identifiers, creates an XML node for each identifier in the XML passivation document and calls onPassivate() passing the passivation identifier as an argument to it. A  derived AM will override this method in order to return the passivation data for the specific passivation identifier. An example implementation is shown below:


In this case the passivation identifier is checked and if it matches the expected identifier, the passivation data is supplied. 

Finally, passivateState() calls onEndPassivation()  to indicate the end of the passivation process.

The reverse process of activation is similar. 
activateState() calls onStartActivation() to get the activation identifiers. It then loops looking for each activation identifier in the activated XML document. If the identifier is found, calls onActivate() supplying the activation data along with its activation identifier as arguments. The derived AM can identify the instance variable being activated - based on the activation identifier, and restore it.

To test the framework, bring up the Edit Business Components Configuration dialog and  disable Application Module Pooling as it shown below. You do this by right-clicking on the AM in the Application Navigator and selecting Configurations... Then you click on Edit... to edit the specific configuration.


 This will in effect initiate a passivation-activation cycle for each request when the application is running. Finally save the configuration, enable debug logging on the console and run the application. You should see your AM class instance variables being activated.


To further explore this framework, the source code is supplied below.

Conclusion

If you are using class instance variables in the BC layer and you want their values to persit from one request to another, then passivating-activating these variables becomes necessary. The ADF BC framework allows you to do this by overriding the passivateState() and activateState() methods.


Until the next time, keep on JDeveloping!

Code

http://jdeveloperfaq.googlecode.com/files/JDeveloperFAQNo21.rar


Related Posts Plugin for WordPress, Blogger...