Introduction
ADFBC allows for the creation of historical audit trail records at the entity object level via the use of history columns. By default the framework allows for keeping track of historical information for attributes indicated as Created On, Created By, Modified On, Modified By and Version Number. This is explained in section 4.10.12 How to Track Created and Modified Dates Using the History Column of the Fusion Developer's Guide for Oracle Application Development Framework 11g Release 2 guide. The guide also explains how to create your own custom history types in section 4.16 Creating New History Types. In this post we will detail a generic technique to create historical audit trail records using a PL/SQL stored procedure in the database. For this we will use the HR schema and demonstrate how to create an audit trail for the REGIONS and COUNTRIES tables.
Main Theme
Schema changes
Before you start on implementing an audit trail in your ADF application you need to decide on what specific information you need to create a historical trail on. This might include creating audit trail information for specific tables and/or specific columns in these tables. For the sake of this post, I will demonstrate how to create historical information for the REGIONS and COUNTRIES tables in the HR schema. For this purpose you will need to create corresponding REGIONS_HISTORY and COUNTRIES_HISTORY tables. These tables will hold the historic information. Here is a structure of the REGIONS_HISTORY table used for this implementation:
 This table holds the historical data (columns REGION_ID and REGION_NAME) and information related to audit trail such as the user session that created the audit trail (SESSION_ID), the commit number within the session (COMMIT_ID), the type of audit operation, i.e. INSERT, UPDATE, DELETE (OPERATION) and a link to the HISTORY table (HISTORY_ID). The HISTORY table provides the ability to browse for the complete audit trail and its structure is shown below:
 The table holds such information as the date/time of the specific audit trail, the user that has created the audit trail and the user session identifier. For each HISTORY record there are a number of history lines that detail the specific changes. This detailed information is stored in a table called HISTORY_LINE. The structure of the HISTORY_LINE table is shown below:
 As you can see, this table holds audit trail information specific for each change done to the table being audited. The information is kept in this table on a per session commit basis, i.e. for each commit done in the user session. Some of the columns of interest are the following:
 PL/SQL support
Historical audit trail information is created by calling two separate PL/SQL procedures called AUDIT_TABLE and AUDIT_DETAILS. These procedures have been implemented as part of the AUDIT_PKG in the database. AUDIT_TABLE is called to create the corresponding _HISTORY (REGIONS_HISTORY, COUNTRIES_HISTORY) table row while AUDIT_DETAILS is called to create the HISTORY and HISTORY_LINE rows. This is what the AUDIT_TABLE procedure looks like:

The code uses dynamic SQL to call the specific table audit procedures. The AUDIT_PKG package declares an array called tables_to_audit which defines the specific tables to audit. If the table is to be audited it must be added to this array. Here is its declaration for this example:
 Part of this implementation requires that you provide the specific table audit procedures. These procedures are called dynamically by AUDIT_TABLE as mentioned above. The specific audit procedures must conform to the following naming format: AUDIT_table_name, where table_name is the table being audited. For the REGIONS table for instance, the procedure should be called AUDIT_REGIONS. Here is an example implementation of AUDIT_REGIONS:
 The AUDIT_PKG.AUDIT_TABLE procedure will be called from the ADFBC layer to create an audit record for the specific table. The procedure is expecting the current session identifier, a commit identifier, the audit operation (INSERT, UPDATE, DELETE), the table name being audited and the table's primary key. Since the table's primary key is specified as a VARCHAR2 type, it will need to converted to this type if it is of different type. In this case also note the limitation of creating an audit trail for a table that uses a composite primary key. We will seen in part 2 of this post how this is done.
As mentioned earlier, the AUDIT_DETAILS procedure creates or locates the HISTORY record for the specific user session and uses dynamic SQL to create the individual HISTORY_LINE rows. It is shown below:
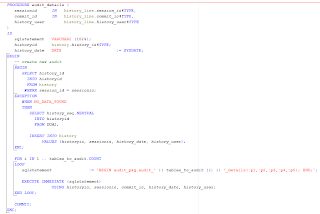
In this case you will also need to implement the specific audit details procedures to generate the HISTORY_LINE rows for the columns that were affected for each specific table. These procedures must conform to the following naming format since they are dynamically called: AUDIT_table_name_DETAILS, where table_name is the table being audited. Here is an example implementation of the AUDIT_REGIONS_DETAILS:
 These procedures determine the differences between the original table (i.e. REGIONS) and the _HISTORY table (i.e. REGIONS_HISTORY) that have occurred for the specific commit session and produce the data in the HISTORY_LINE table.
The AUDIT_PKG.AUDIT_DETAILS procedure will be called from the ADFBC layer specifying the user's session identifier, the commit identifier and the user name. We will see this in the second part of this post.
Conclusion
We will conclude in the next part where we will see how to hook up this implementation to the ADFBC framework. We will do this in a generic way that will require minimal changes only to framework extension classes.
Until then, enjoy JDeveloping!
ADFBC allows for the creation of historical audit trail records at the entity object level via the use of history columns. By default the framework allows for keeping track of historical information for attributes indicated as Created On, Created By, Modified On, Modified By and Version Number. This is explained in section 4.10.12 How to Track Created and Modified Dates Using the History Column of the Fusion Developer's Guide for Oracle Application Development Framework 11g Release 2 guide. The guide also explains how to create your own custom history types in section 4.16 Creating New History Types. In this post we will detail a generic technique to create historical audit trail records using a PL/SQL stored procedure in the database. For this we will use the HR schema and demonstrate how to create an audit trail for the REGIONS and COUNTRIES tables.
Main Theme
Schema changes
Before you start on implementing an audit trail in your ADF application you need to decide on what specific information you need to create a historical trail on. This might include creating audit trail information for specific tables and/or specific columns in these tables. For the sake of this post, I will demonstrate how to create historical information for the REGIONS and COUNTRIES tables in the HR schema. For this purpose you will need to create corresponding REGIONS_HISTORY and COUNTRIES_HISTORY tables. These tables will hold the historic information. Here is a structure of the REGIONS_HISTORY table used for this implementation:


- HISTORY_TABLE - The name of the table that was audited
- FIELD_NAME - The name of the column with the HISTORY_TABLE that was audited
- OPERATION - The operation on the column, i.e. INSERT, UPDATE, DELETE
- VALUE_OLD - The original column data value
- VALUE_NEW - The new column data value

Historical audit trail information is created by calling two separate PL/SQL procedures called AUDIT_TABLE and AUDIT_DETAILS. These procedures have been implemented as part of the AUDIT_PKG in the database. AUDIT_TABLE is called to create the corresponding _HISTORY (REGIONS_HISTORY, COUNTRIES_HISTORY) table row while AUDIT_DETAILS is called to create the HISTORY and HISTORY_LINE rows. This is what the AUDIT_TABLE procedure looks like:

The code uses dynamic SQL to call the specific table audit procedures. The AUDIT_PKG package declares an array called tables_to_audit which defines the specific tables to audit. If the table is to be audited it must be added to this array. Here is its declaration for this example:


As mentioned earlier, the AUDIT_DETAILS procedure creates or locates the HISTORY record for the specific user session and uses dynamic SQL to create the individual HISTORY_LINE rows. It is shown below:

In this case you will also need to implement the specific audit details procedures to generate the HISTORY_LINE rows for the columns that were affected for each specific table. These procedures must conform to the following naming format since they are dynamically called: AUDIT_table_name_DETAILS, where table_name is the table being audited. Here is an example implementation of the AUDIT_REGIONS_DETAILS:

The AUDIT_PKG.AUDIT_DETAILS procedure will be called from the ADFBC layer specifying the user's session identifier, the commit identifier and the user name. We will see this in the second part of this post.
Conclusion
We will conclude in the next part where we will see how to hook up this implementation to the ADFBC framework. We will do this in a generic way that will require minimal changes only to framework extension classes.
Until then, enjoy JDeveloping!


