Showing posts with label Beginner. Show all posts

Tuesday, June 7, 2011

FAQ #35 - How to set default values for View object row attributes

Introduction

In this post we will see how to set default values to View object attributes. There are a number of places where you can do this:

  • In the overridden View object row create() method
  • Declaratively using a Groovy expression
  • In the attribute getter method

To demonstrate each case, consider the use case of setting the employee’s hire date to the current date for a newly created View object row.

Main Theme

Setting default attribute values in the overriden ViewImpl create()

To set the default value for a View object attribute in the overridden create() method, follow these steps:

  • Create a View Row custom Java implementation class for the Employees View object.
  • Open the EmployeesRowImpl.java custom View Row Java implementation class and override the create() method using the Override Methods… button – the green left arrow on the editor toolbar.
  • To set the default employee’s hire date to today’s date, add the following code to create() immediately after the call to super.create():
              // set the default hire date to today
             this.setHireDate((Date)Date.getCurrentDate());

Setting default attribute values with a Groovy expression

To set the attribute default value using a Groovy expression, follow these steps:
  • Open the Employees View object definition and go to the Attributes page.
  • Select the attribute that you want to initialize – HireDate in this case, and click on the Edit selected attribute(s) button (the pen icon).
  • On the Edit Attribute dialog select the View Attribute node.
  • Select Expression for the Value Type radio button in the Attribute section.
  • Enter the following Groovy expression in the Value field: adf.currentDate


Returning a default value from the attribute getter

Another way to set a default value for a View object attribute is in the attribute getter method. Follow these steps to set the default employee hire date:

  • Locate the View object attribute getter in the View object custom row implementation class. In this example is the getHireDate() method in EmployeesRowImpl.java.
  • Replace the existing code in getHireDate() with the following:

          // get the HireDate attribute value
          Date hireDate = (Date)getAttributeInternal(HIREDATE);
          // check for null and return today's date if needed
          return (hireDate == null) ? (Date)Date.getCurrentDate() : hireDate;

Note that using this technique we don’t actually set the attribute value; rather we return a default value, which can be subsequently applied to the attribute. Also notice that this is done only if the attribute does not already have a value (the check for null).

Actually setting an attribute value in a getter is not a recommended practice.

Attribute dependency

A common use case related to this topic is setting an attribute’s value based on the value of another related attribute. Consider for instance the use case where the employee’s commission should be set to a certain default value if the employee is part of the Sales department. Also consider the case where the employee’s commission should be cleared if the employee is not part of the Sales department. In addition to accomplishing this task with Groovy as stated earlier, it can also be implemented in the employee’s DepartmentId setter, i.e. in the setDepartmentId() method as it is shown below:

    public void setDepartmentId(Number value) {
        // set the department identifier
        setAttributeInternal(DEPARTMENTID, value);
        // set employee's commission based on employee's department
        try {
            // check for Sales department
            if (value != null && SALES_DEPARTMENT_ID == value.intValue()) {
                // if the commission has not been set yet
                if (this.getCommissionPct() == null) {
                    // set commission to default
                    this.setCommissionPct(new Number(DEFAULT_COMMISSION));
                }
            } else {
                // clear commission for non Sales department
                this.setCommissionPct(null);
            }
        } catch (SQLException e) {
            // log the exception
            LOGGER.severe(e);
        }
    }

Conclusion

As you can see, there are a number of different ways for initializing your View object row attributes. Which one you choose depends on the specific use case at hand. It is common on large projects that a combination of all (and more) is used. Setting a standard approach could be appropriate in this case.

Until the next time, keep on JDeveloping!

Tuesday, March 22, 2011

FAQ #33 - How to configure ADF diagnostics logging in WLS, Pt. 3

Introduction

In this third installment of posts related to the configuration of ADF diagnostics logging we will focus on the following topics: 1) how logs could be added programmatically to the diagnostics log, 2) how new Loggers could be added and configured to the diagnostics logging configuration and 3) how to dynamically configure the WebLogic diagnostics logging. This includes changing the logging levels for the configured loggers at run-time without the need to restart the server.


Main Theme

For some background information regarding diagnostics logging as it relates to ADF, JDeveloper and WebLogic refer to these earlier posts: FAQ #6 - How to fine tune ADF diagnostics logging in JDeveloper 11g R1  , FAQ #7 - How to configure ADF diagnostics logging in standalone WLS using JDeveloper 11g R1 and FAQ #8 - How to perform log analysis using the Diagnostic Log Analyzer in JDeveloper 11g . The main advantages of using Oracle Diagnostics Logging (ODL) when compared to other logging frameworks is its tight integration with WebLogic and JDeveloper. In WebLogic, the logs produced conform to and integrate with the diagnostics logging facility. Diagnostic logs include in addition to the message logged additional information such as the session and user that produced the log entry at run-time. This is essential when analyzing the logs. In JDeveloper the log configuration and analysis is integrated via the Oracle Diagnostics Logging Configuration and Oracle Diagnostics Log Analyzer respectively. Both are discussed in detail in the above referenced posts.

Programmatic Usage

Diagnostic logs can be generated programmatically from within your code by using the ADFLogger class. You simply instantiate an ADFLogger via the static createADFLogger() method and use its log() method. log() accepts a java.util.logging.Level parameter indicating the log level of the message that you are logging and it can be any of the ADFLogger.INTERNAL_ERROR, ADFLogger.ERROR, ADFLogger.WARNING, ADFLogger.NOTIFICATION and ADFLogger.TRACE. You can also use the severe(), warning(), info(), config(), fine(), finer() and finest() methods to do your logging. Here is an example:

// create the ADFLogger
private ADFLogger logger = ADFLogger.createADFLogger("package.class");
// log a trace
logger.log(ADFLogger.TRACE, "A trace log");


Configuration of Custom Loggers in JDeveloper

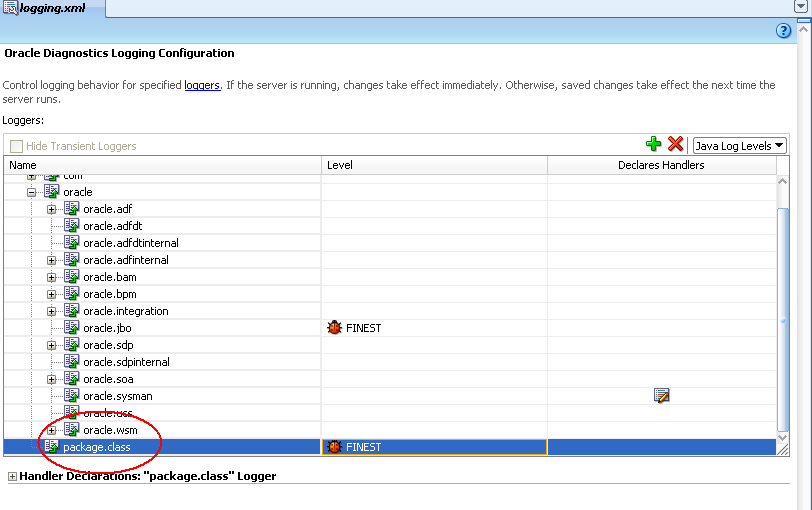
In the ADFLogger example above, "package.class" is a custom logger which is associated with the ADFLogger. You will need to configure this custom logger in the diagnostics logging configuration file logging.xml. Ensure that you load the appropriate logging.xml file for the WebLogic server you are configuring. The file can be found in the domain config\fmwconfig\servers directory for each server. So, open the appropriate logging.xml configuration file in JDeveloper and create a custom logger called "package.class" by clicking on the Add Logger icon as it shown below.

In the Add Persistent Logger dialog that is presented add the logger class specified above in the ADFLogger (i.e. package.class), set its logging level and click OK.


The custom logger will appear in the list of Loggers as it shown below. With its logging level set appropriately, your trace log in the earlier example will show in the diagnostics log.


Dynamic Configuration of Logging in WebLogic

Diagnostics logging can be configured dynamically in WebLogic via the wlst tool. Ensure that you run the wlst script located in the oracle common directory  - %MIDDLEWARE_HOME%\oracle_common\common\bin for a JDeveloper installation - and not the one under the WebLogic server home - %MIDDLEWARE_HOME%\wlserver_10.3\common\bin for the stand-alone WebLogic installed along with JDeveloper. The former provides custom commands for configuring diagnostics logging. First you will need to connect to the admin server via the connect() command as in connect('weblogic','weblogic1','t3://address:7001'). To change the logging level for the custom logger class above, use the setLogLevel() command as in setLogLevel(target="ManagedServer1", logger="package.class", level="ERROR"). Specify the target WebLogic server with the target= argument (ManagedServer1 in this example), the logger class with the logger= argument and the new logging level with the level= argument. It can be either a Java level or an ODL level. Some valid Java levels are: SEVERE, WARNING, INFO, CONFIG, FINE, FINER, or FINEST. Valid ODL levels include a message type followed by a colon and a message level. The valid ODL message types are: INCIDENT_ERROR, ERROR, WARNING, NOTIFICATION, TRACE, and UNKNOWN. The message level is represented by an integer value that qualifies the message type. Possible values are from 1 (highest severity) through 32 (lowest severity). Additional commands for dynamic configuration of the diagnostics log will allow you to configure the Log Handler for each logger class, display the currently configured loggers and so on. For more details, check out the documentation references sited below.


Conclusion

If you are considering a logging framework for an application to be deployed on WebLogic, I suggest that you take a closer look at the Oracle Diagnostics Logging facility. Its tight integration with JDeveloper (logging configuration and log analysis) and WebLogic (diagnostics log format, dynamic configuration) makes it a comparable choice.

Until the next time, keep on JDeveloping!


References

Logging Custom WLST Commands
Using Custom WLST Commands


Sunday, November 7, 2010

FAQ #29 - How to deploy the ADF runtime libraries to a WebLogic cluster

Introduction

In FAQ #27 and FAQ #28 we went through a WebLogic cluster setup comprised of two WebLogic Managed Servers running on separate physical machines each. In this FAQ we will take a look at how to extend the clustered domain with the ADF runtime libraries.


Main Theme

The steps involved for extending a clustered domain are:

1. Backup the Middleware Home that contains the domain about to be extended
2. Install the ADF Runtime
3. Extend the WebLogic domain
4. Verify that the cluster is operating as expected

Note that steps 1 through 3 must be repeated for each physical machine that is part of the cluster setup.

Let's follow these steps then to extend the clustered domain that we setup in FAQ #27 and FAQ #28.

1. Backup the Middleware Home that contains the domain about to be extended

Before backing up the Middleware Home directory ensure that the domain is shutdown and that the node manager is not running on the specific machine. We will use tar and gzip to create and compress the Middleware Home archive, so change directory to your Middleware Home and type tar cvf hostname.date.middlewarehome.tar middlewareHomeDirectory, where hostname.date.middlewarehome.tar is the tar file that we will create and  middlewareHomeDirectory is the Middleware Home directory to archive, for example: tar cvf kvvm0007.20101107.middlewarehome.tar Oracle/


Once tar completes, compress the archive by typing gzip hostname.date.middlewarehome.tar


Keep the resulting tar.gz file just in case we need to restore the Middleware Home to its last configuration. 


2. Install the ADF Runtime

The ADF Runtime is distributed - among others - along with the JDeveloper installation package. So we will be using the JDeveloper installation to install it on our domain. Download the appropriate JDeveloper installation package for your operating system and start the JDeveloper installation. For installing on Linux you may refer to FAQ #26 - How to Install JDeveloper on Linux. Click Next on the Welcome screen and on the Choose Middleware Home Directory make sure that you select Use an existing Middleware Home. Verify that the Middleware Home selected is the one that contains the clustered domain to be extended.


On the Choose Products and Components page make sure that you select only the Application Development Framework Runtime - do not select JDeveloper Studio.


Click Next on the JDK Selection page. Verify that you have selected the correct Middleware Home on the Confirm Product Installation Directories page and click Next. On the Installation Summary page click Next to proceed with the installation. Ensure that only the Application Development Framework Runtime is included on the products to be installed.


The installation should proceed with no problems and complete. Uncheck the Run Quickstart and click Done to finish.


3. Extend the WebLogic domain


To extend the domain with the ADF libraries installed run the configuration script called config in wlserver_10.3/common/bin under the Middleware Home.


On the Welcome screen choose Extend an existing WebLogic domain and click Next. On the Select a WebLogic Domain Directory select the appropriate domain for the cluster and click Next.


On the Select Extension Source page select Oracle JRF - 11.1.1.0 [oracle_common] and click Next.


On the Select Optional Configuration select Deployments and Services and click Next.


On the Target Deployments to Clusters or Servers ensure that all Libraries are targeted to both the Administration Server and the Cluster while the Applications are targeted only to the Administration Server. The page should look like the one below:


On the Target Services to Clusters or Servers make sure that all services are targeted to both the cluster and the Administration Server.


On the Configuration Summary page verify your selections and press Extend to extend the domain. The domain should be extended without any errors reported.


This concludes the process of extending the domain with ADF runtime. Remember that you will have to repeat the steps above for all the machines in the cluster.


4. Verify that the cluster is operating as expected


This step should be performed once you gone through steps 1 through 3 above for all the machines on the cluster. Start the domain Administration Server and the node managers for all machines and log in into the Administration Console. Using the Domain Structure tree click on Deployments and on the Summary of Deployments page verify that all the ADF libraries are on Active State.


This being the case, you can now proceed to start the Managed Servers. Click on Environment and then on Servers on the Domain Structure tree and on the Summary of Servers click on the Control tab. In the servers table select all the Managed Servers that comprise the cluster and click on the Start button to start them. Once started all servers should be in RUNNING State. The Health of the server should be indicated as OK.


This concludes the installation of the ADF runtime to the cluster.


Conclusion

Installing the ADF runtime on a clustered WebLogic domain involves the extension of the domain on each physical server machine. The ADF runtime can be installed using the JDeveloper installation package.

Until the next time, keep on JDeveloping (on a cluster)!


Friday, October 22, 2010

FAQ #26 - How to Install JDeveloper on Linux

Introduction

A recent post on OTN related to the installation of JDeveloper on Linux is the inspiration for this FAQ. Let's go over the installation then and discover on the way how difficult or - as it turns out - how easy it is.

Main Theme

Start by downloading the latest version of JDeveloper - at the writing of this, it is 11.1.1.3.0 - from the Oracle JDeveloper Downloads web page. This download page can be accessed directly by typing the following address on your browser: http://www.oracle.com/technetwork/developer-tools/jdev/downloads/soft11-098086.html.


Once the download is done, open a terminal window and go to the directory where the installation package file resides. Ensure that you have given read and execute permissions to the installation auto-extraction package file and start its execution by typing ./jdevstudio11113install.bin, where jdevstudio11113install.bin is the name of the downloaded installation package filename. This will start the unpacking of the installation package and upon completion it will present the Welcome installation page.


Note that if you are having trouble seeing the Welcome page in graphical mode, ensure that the $DISPLAY environment variable is set correctly.

Click Next to proceed to the Choose Middleware Home Directory page and possibly accept the default Middleware Home Directory proposed by the installation program, namely Oracle/Middleware.


In the Choose Install Type page you can choose Complete to install all available components, that is JDeveloper, ADF support and the WebLogic Server. This would be fine, unless you want to selectively install certain components only.


Click Next and confirm the installation directories in the Confirm Product Installation Directories page. Confirm and click Next once more to proceed to the Installation Summary page.


Review the installation summary and when ready press Next to proceed with the installation.


The installation will start and upon a successful installation you should see the Installation Complete page. Uncheck the Run Quickstart checkbox and click Done to exit.


That's all there is to it.

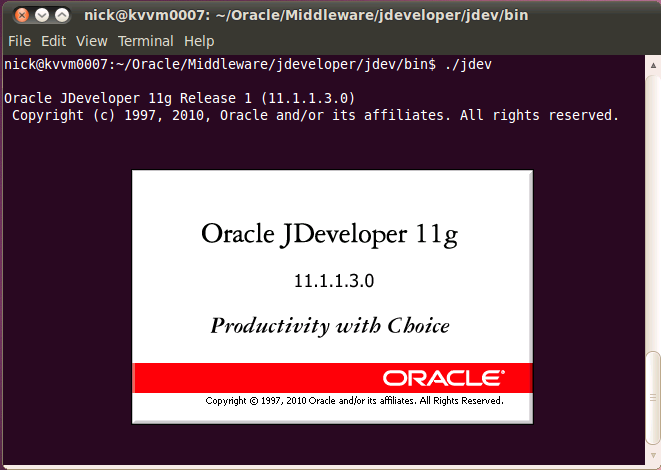
To start JDeveloper, go to the /jdeveloper/jdev/bin directory under the Middleware Home you selected during the installation and type ./jdev


JDeveloper should start.


You are know ready for developing your applications on Linux using JDeveloper. To make things easier create a shortcut to the specific file on your Linux desktop if you prefer.

Conclusion

As it turns out, installing JDeveloper on Linux is very simple. Simply download the Linux version of the JDeveloper installation package and run it. Follow the directions presented during the installation and when done, start JDeveloper by running the jdev executable in the /jdeveloper/jdev/bin directory.

Until the next time, keep on JDeveloping (on Linux)!


Sunday, April 18, 2010

FAQ #20 - How to refactor ADF components in JDeveloper

Introduction

When it comes to refactoring ADF components in JDeveloper, most ADF developers come to know the refactoring features when they rename, move or delete Business Components (BC) objects. Yet fewer know that additional options exist in JDeveloper to refactor object attributes, attribute domain types, bindings, JSF pages and more.


Main Theme

Refactoring ADF BC objects

Refactoring ADF BC objects is available through the Rename... and Move... menu selections of  the Refactor menu. You can display the Refactor menu when you right-click on the BC component in the Application Navigation window.


If you choose to rename a component, JDeveloper will present a Rename dialog. In this dialog you can specify the new name for the object and choose to preview the changes that will be generated by the refactoring process.


It is a good idea to preview the changes, when the Preview option is available. When you click Preview in this case,  a Rename Log window will open listing all the changes that will be made by the refactoring process.


You can browse through the changes by clicking the Synchronize with Editor button This is a toggle button. It will open the applicable source file as you click through the changes in the Log window. When you are done reviewing the changes, click on the Do Refactoring button to apply the changes. If you decide for whatever reason not to go ahead with the refactoring, just close the Rename Log window.

Choose Move... from the Refactor menu to move the BC object to another package. This will present a Move dialog, where you can specify the new package name for the object to be moved.


Deleting a BC object is not available under the Refactor menu. It is available as a separate Delete menu option in the same context menu.


When you select Delete to delete a BC object,  a Confirm Delete dialog will be presented. If the BC object you are about to delete is used throughout the project, a Show Usages button will be also be available in the  Confirm Delete dialog and a Log window will open displaying all of the object's usages.


To view the object's usages on the Confirm Delete dialog itself, click on the Show Usages button.


To individually inspect each object usage, first click No to dismiss the Confirm Delete dialog. Then in the Log window click the Synchronize with Editor toggle button  and browse through the object's usages. As you browse through the object's usages, the corresponding source file will be opened and you will be positioned exactly where the object is being referenced in the source.


 Refactoring ADF BC Object Attributes

Refactoring ADF BC object attributes allows you to rename, delete and change the domain type of a BC object's attribute. Moving an attribute is not supported. To refactor an attribute, bring-up the object's overview editor by double-clicking on the object in the Application Navigator window and select the Attributes pane. Then right-click on the attribute and select Rename... or Delete from the context menu that is displayed.


In both cases - renaming or deleting the attribute, you can preview the usages - as described earlier before proceeding with the refactoring process. Consider also selecting Find Usages... from the context menu to review the attribute usages without doing any refactoring.

In addition to renaming and deleting an attribute, you can also refactor the attribute domain type by selecting Change Type.. from the context menu. This will display a Change type dialog from where you can select the new domain type for the attribute. You can also choose to preview the changes in the Change type Log window. This window will open when you select Preview and click OK.


Refactoring Data Bindings

You can refactor bound objects in the Data Binding Definition page. To do so, bring up the Page Definition File associated with a JSF page and in the Overview tab right-click on the specific binding that you want to refactor. Then choose Rename... or Delete from the Refactor menu.


Again, before you delete a binding you can verify its usages by clicking the View Usages button in the Delete Safely dialog that is displayed. This will open the Delete Safely Log window where you can review the usages. Click on the Synchronize with Editor toggle button  to bring up each usage into the source editor.


Refactoring JSF Pages

You can refactor a JSF page by right-clicking on the page in the Application Navigator and selecting Rename..., Move... or Delete from the Refactor menu. JDeveloper will update all references to the page in task flows and in the DataBindings.cpx mappings when renaming or moving the page.


Conclusion

The refactoring options in JDeveloper are quite powerful and can help substantially during the development process. They range from refactoring data components objects, object attributes, attribute domain types, data bindings, JSF pages and files. For more information about refactoring and their limitations I suggest that you check out the Fusion Developer's Guide - referenced below.

Until the next time, keep on JDeveloping!


Reference

Oracle® Fusion Middleware Fusion Developer's Guide for Oracle Application Development Framework 11g Release 1 (11.1.1) Part Number B31974-02


Related Posts Plugin for WordPress, Blogger...