Wednesday, February 15, 2017

FAQ #39 - Handling session expiration redirection in ADF 12c

Introduction

So how is this handled in 12c? I asked this to myself when I had to migrate an 11g ADF application to 12c. It seems that other people are asking about it too (see: https://community.oracle.com/thread/3952768, https://community.oracle.com/message/12531687#12531687, https://community.oracle.com/message/12497105#12497105 and so on) but no answers yet. The tried and tested implementation in 11g was to implement a custom filter, detect a session expiration and if that occurs redirect to a session-expired page. This is all good but... it does not work in 12c.

Main Theme

Google this

It is unfortunate for yet another instance there is practically no documentation on this at all. After googling intensly on the topic for a couple of days (talk about "agile" programming), I landed on this Oracle A-TEAM blog post, which seemed promising: http://www.ateam-oracle.com/customizing-session-time-out-pop-ups/. The post details how to customize the session expiration dialogs. Right at the top of the post there is a link with tips-on-dealing-with-the-session-time-out-popup. Eureka! As an older Greek colleague once said. So I navigated to it (http://www.ateam-oracle.com/tips-on-dealing-with-the-session-time-out-popup/) only to find out - to my dissapointment - that this was the good old 11g approach. Bammer.

Deep poetry

Well, not everything was lost. A small glimpse of hope appeared thanks to an initially seeming esoteric comment at the bottom by Deep Saurabh (Thank you Mr. Saurabh). And the comment goes something like this:

"If neither of above two is working , override NewSessionURLProvider service/provider.
( http://docs.oracle.com/middleware/1212/adf/FACAR/oracle/adf/view/rich/context/NewSessionURLProvider.html )
In the web lib’s META-INF/services folder you should have file:
oracle.adf.view.rich.context.NewSessionURLProvider
(for quick test run from jdev create META-INF/services under your ViewController/public_html/WEB-INF/classes/)

Which should contain FQCN of your custom overridden AdfcNewSessionURLProvider class."

Hmm? What did the Deep poet mean?

Enter NewSessionURLProvider

Well, other than the Deep comment above - which at the time I did not quite understand - the only other thing I had to go was the NewSessionURLProvider class. Here is the 12.2.1 class JavaDoc: https://docs.oracle.com/middleware/1221/adf/api-reference-faces/oracle/adf/view/rich/context/NewSessionURLProvider.html
The class is simple enough. It is an abstract class that needs to be overridden in the 12c ADF application by implementing the getNewSessionURL() method. As the documentation states, getNewSessionURL() is "Used to provide the view with a URL to create a new session if the current session expires while the current page is displayed.". Like I said, simple enough. That would be the first step. Override NewSessionURLProvider in your ADF application and provide an implementation for getNewSessionURL(). The code should look like this:

package com.jdeveloper.faq.services;

public class MyNewSessionURLProvider extends NewSessionURLProvider {
  @override
  public String getNewSessionURL(FacesContext fc) {
    return "pages/YourSessionExpirationPage.html";
  }
}

All you have to do is return the page that you want the application to redirect upon session expiration.

What next?

It is unclear what needs to happen next, to miraculously connect your ADF 12c application to the ADF framework and instruct it to redirect to your page. If you decypher the line "In the web lib’s META-INF/services folder you should have file: oracle.adf.view.rich.context.NewSessionURLProvider" from the comment above, it simply states what needs to be done next:

In your application's JDeveloper web ViewController project, under the src/META-INF directory create a new directory called services.In the src/META-INF/services directory create a text file (no extension) literally called oracle.adf.view.rich.context.NewSessionURLProvider. Edit the src/META-INF/services/oracle.adf.view.rich.context.NewSessionURLProvider text file and in it type the FQCN of your overridden NewSessionURLProvider class. This is what the src/META-INF/services/oracle.adf.view.rich.context.NewSessionURLProvider text file should look like:

com.jdeveloper.faq.services.MyNewSessionURLProvider

That's all?

Pretty much. The only other thing that needs to be done is to ensure that the src/META-INF/services/oracle.adf.view.rich.context.NewSessionURLProvider file in included in your deployed WAR file (during the application EAR deployment). In order to do that, edit the web ViewController deployment profile properties and under the WEB-INF/classes file group Contributors ensure that the Project Source Path is checked. Verify that the services/oracle.adf.view.rich.context.NewSessionURLProvider is included in the file list by selecting Filters under the WEB-INF/classes file group. Once you deploy your application, open the WAR and ensure that the services/oracle.adf.view.rich.context.NewSessionURLProvider text file is indeed included in the archive.

You are now ready to test it. Don't forget to remove the 11g custom filter implementation from web.xml.

Conclusion

I personally like the session expiration redirection implementation in 12c. No need to come with custom filters and all. Hopefully this will be documented in future releases of ADF.

Until the next post,(and that may be a long long time...) have fun with JDeveloping!

Thursday, December 6, 2012

Oracle JDeveloper 11gR2 Cookbook

After almost a year of truly great effort by everyone involved, I am happy to announce that my Oracle JDeveloper 11gR2 Cookbook book is published by Packt Publishing. This book accumulates to a large degree my practical experience amassed over the last four years working on real world ADF projects.

Special Thanks goes to Frank Nimphius, Edwin Biemond and Spyros Doulgeridis for their insight, knowledge and advice.  

For further details about the book click here

Here are some peer references/reviews of the book from the blog sphere:

Friday, March 9, 2012

FAQ #38 - How to add help to an ADF application

Introduction

Adding help to an ADF Fusion Web application is thoroughly explained in section 19.5 Displaying Help for Components of the Web User Interface Developer’s Guide for Oracle Application Development Framework guide. Yet, as it seems from this post https://forums.oracle.com/forums/message.jspa?messageID=10190922#10190922 in the JDeveloper and ADF forum at OTN, some of us still have questions around this subject. In this post I will attempt to clarify the subject of adding help to your ADF application by presenting pretty much the same information but in a different approach, so I suggest that before continuing with the reading this post you first take a look at the aforementioned link in the guide. Then, if you still have questions, read on.

Main Theme

Help added to an ADF Fusion Web application is categorized based on where the help contents are stored. Currently the help contents can be stored in any of the following mediums:
  • In a resource bundle
  • In a managed bean, or 
  • In an XML Localization Interchange File Format (XLIFF) XML file
So the first step would be to determine where your help contents will be stored. As mentioned, you have the choices listed above. So the first step entails having to make a design decision which one to use. What gets a little bit confusing is that each one of the three choices above allows you to display help using an external URL, which will open the help contents in a separate browser window.

So how do you add help to your ADF Fusion Web application? Simply by adding a help-provider tag to the adf-settings.xml configuration file. The adf-settings.xml file resides in the .adf/META-INF directory and it is accessible in JDeveloper in the Application Resources part of the Application Navigator via the Descriptors | ADF META-INF node. Depending on the help contents location (one of the three choices listed above) you need to provide values for the help-provider-class and property tags under the help-provider tag. Here is an example for the case where the help contents are stored in a resource bundle:

In the table below I have listed the appropriate help provider classes and property names/values depending on the location of the help contents:


You can provide external URL help in each case (resource bundle, managed bean, XLIFF) by providing your own custom help provider class. Just make sure that in each case you extend the appropriate default help provider class (shown in the table above), i.e. oracle.adf.view.rich.help.ResourceBundleHelpProvider for resource bundle based help or oracle.adf.view.rich.help.ELHelpProvider for managed bean or XLIFF based help.

For the remainder of this post, we will see how to add help utilizing the resource bundle method, which is in my opinion the most straightforward case. In this case all you have to do is to create a resource bundle, i.e. a text file with the file extension .properties and add the help contents to it. The help contents are made up of text lines that conform to the following naming convention:

help_topic_id=help_topic_data

where help_topic_id is the help topic identifier and help_topic_data is the actual help shown to the user. Here is an example:

PREFIX_TOPIC1_INSTRUCTIONS=Example for help instructions
PREFIX_TOPIC1_DEFINITION=Example for help definition
A few things to notice about the help topic identifiers:
  • For the same topic (TOPIC1 in the example above), you can define both instructions help and definition help by appending _INSTRUCTIONS and _DEFINITION to the end of the id respectively. Instructions help usually appears as you tab from one UI component to another, while definition help usually appears as a help icon in front of the UI component but this may vary depending the UI component. Again, take a look at section 19.5 Displaying Help for Components of the Web User Interface Developer’s Guide for Oracle Application Development Framework guide for more information on this.
  • Notice the prefix (PREFIX_ in the example above) used by the help topic identifiers. The prefix identifies the help provider and is specified in the help-provider tag in the adf-settings.xml configuration file.

Finally, how do you assign help topic identifiers to UI components? For this you can use the HelpTopicId property under Appearance in the Property Inspector, just don't add the _INSTRUCTIONS or _DEFINITION part of the help topic id:


The result of using PREFIX_TOPIC1 for an af:inputText UI component is shown below:

As soon as you tab into the inputText component the instructions help is shown. The definition help is shown by hovering the mouse on the question mark icon added by the framework in front of the inputText component.

One last thing: the question mark icon could actually become a button that when clicked will display help from an external URL in a separate browser window. As mentioned earlier, you do this by extending the default help provider. But again, this is explained nicely in the documentation.

Conclusion

Hopefully this post clarified any additional questions that you might have had related to adding help to your ADF Fusion Web application.

Until the next post, have fun with JDeveloping!

Thursday, March 8, 2012

FAQ #37 - How to create audit trail records using ADFBC, Pt. 2

Introduction

In this second part of creating historical audit trail records using ADFBC we will see how to integrate, in a generic way, the stored procedures introduced in part 1 of these series. For more information on the database schema and stored procedures that are required to support this technique refer to FAQ #36 - How to create audit trail records using ADFBC, Pt. 1.

Main Theme

As explained in part 1 (FAQ #36 - How to create audit trail records using ADFBC, Pt. 1), historical audit trails are generated by calling the stored procedures AUDIT_TABLE and AUDIT_DETAILS. Both of these procedures are part of the AUDIT_PKG database package.

The AUDIT_TABLE procedure is called to create a historical audit trail of the corresponding table. As explained in part 1, corresponding history tables are created for each table being audited. These history tables conform to the following naming convention: table_name_HISTORY where table_name is the table being audited.  For example the corresponding history REGIONS table is called REGIONS_HISTORY.

To create a generic implementation, we will need to create framework extension classes for both the oracle.jbo.server.EntityImpl and oracle.jbo.server.ApplicationModuleImpl classes. Once these framework extension classes are created ensure that the ADFBC project settings are changed to reflect this fact. You do this by bringing up the Project Properties dialog and selecting ADF Business Components | Base Classes as it is shown in the picture below:

The next step is to override the EntityImpl doDML() method for the EntityImpl extension framework class and add the following code to it:

Note a few things about this overridden doDML() method:

  1. We call getEntityDef().getProperty(DISABLE_AUDIT_PROPERTY) to determine whether auditing for the specific entity object has been disabled. This is controlled by the presence of an entity object property identified by the constant DISABLE_AUDIT_PROPERTY. As long as this property has not been defined in the entity object, auditing is enabled by default.
  2. We call getEntityDef().getSourceType() to determine the source type of the entity object. We will audit entity objects based on database tables only. This is done by comparing the return value of getEntityDef().getSourceType() to DBOBJ_TYPE_TABLE. DBOBJ_TYPE_TABLE is a constant defined in oracle.jbo.server.EntityDefImpl indicating that the entity object is based on a database table.
  3. The first parameter required by the AUDIT_TABLE stored procedure is the user's current session identifier. This can be retrieved by calling SessionImpl.findOrCreateSessionContextManager().getCurrentSession().getId(). Take a look at this post for information on this: Bit #39 - Retrieving the current session id at the ADFBC layer.
  4. The second parameter passed to AUDIT_TABLE stored procedure is the commit identifier. We would like to keep track changes for each commit done in the same user session. We retrieve the commit identifier from a database sequence by calling the helper getCommitId() (see source code below).
  5. We pass the DML operation as a string (INSERT, UPDATE or DELETE) based on the value of the operation parameter passed to doDML() by the ADFBC framework.
  6. We call getEntityDef().getSource() to get the name of the table associated with the entity object.
  7. Finally we call the getEntityId() helper (see code below) to get the entity object's primary key. Note that we convert the primary key to a string before passing as a parameter to the AUDIT_TABLE stored procedure.
Here is the code for the getCommitId() and getEntityId() helpers:

Notice a couple of things about these helper methods:
  1. In getEntityId() we iterate through the entity object attributes in order to determine the primary key attribute. We do this by first calling getStructureDef().getAttributeDefs() to get the attribute definitions and then by calling isPrimaryKey() for each attribute to determine if it is a primary key attribute. If it is, we call getAttribute() to retrieve and return its value. Notice that you will have to expand this implementation if you have an entity object with a composite primary key.
  2. In getCommitId() we add the commit identifier returned from the database sequence to the session user data by calling getDBTransaction().getSession().getUserData(). We do this because we will need the same commit identifier at a later stage when calling the AUDIT_DETAILS stored procedure.
As explained in part 1 of this post, to create the specific details of the audit trail we need to call AUDIT_PKG.AUDIT_DETAILS stored procedure. To do this, override the afterCommit() in the ApplicationModuleImpl framework extension class and add the following code to it:


Notice in this case how we call getSession().getUserData().get(ExtEntityImpl.COMMIT_ID) to get the same commit identifier and pass it as a parameter to the AUDIT_DETAILS stored procedure. Also, notice that we remove the commit identifier from the session user data once we are done with calling the stored procedure.

Conclusion

In this two-part series we've seen a custom implementation of creating a historical audit trail based on a stored procedure implementation in the database. Notice that this technique is fairly generic as it does not require any additional implementation in the specific entity objects used throughout the application. As mentioned above, auditing is enabled by default and can be disabled by the presence of a property defined in the entity object. This can be easily reversed so that auditing is not done by default. If you found this useful, let me know so I can email you or post the source code as well.

Until the next time, have fun JDeveloping!


Wednesday, March 7, 2012

FAQ #36 - How to create audit trail records using ADFBC, Pt. 1

Introduction

ADFBC allows for the creation of historical audit trail records at the entity object level via the use of history columns. By default the framework allows for keeping track of historical information for attributes indicated as Created On, Created By, Modified On, Modified By and Version Number. This is explained in section 4.10.12 How to Track Created and Modified Dates Using the History Column of the Fusion Developer's Guide for Oracle Application Development Framework 11g Release 2 guide. The guide also explains how to create your own custom history types in section 4.16 Creating New History Types. In this post we will detail a generic technique to create historical audit trail records using a PL/SQL stored procedure in the database. For this we will use the HR schema and demonstrate how to create an audit trail for the REGIONS and COUNTRIES tables.

Main Theme

Schema changes

Before you start on implementing an audit trail in your ADF application you need to decide on what specific information you need to create a historical trail on. This might include creating audit trail information for specific tables and/or specific columns in these tables. For the sake of this post, I will demonstrate how to create historical information for the REGIONS and COUNTRIES tables in the HR schema. For this purpose you will need to create corresponding REGIONS_HISTORY and COUNTRIES_HISTORY tables. These tables will hold the historic information. Here is a structure of the REGIONS_HISTORY table used for this implementation:

This table holds the historical data (columns REGION_ID and REGION_NAME) and information related to audit trail such as the user session that created the audit trail (SESSION_ID), the commit number within the session (COMMIT_ID), the type of audit operation, i.e. INSERT, UPDATE, DELETE (OPERATION) and a link to the HISTORY table (HISTORY_ID). The HISTORY table provides the ability to browse for the complete audit trail and its structure is shown below:

The table holds such information as the date/time of the specific audit trail, the user that has created the audit trail and the user session identifier. For each HISTORY record there are a number of history lines that detail the specific changes. This detailed information is stored in a table called HISTORY_LINE. The structure of the HISTORY_LINE table is shown below:

As you can see, this table holds audit trail information specific for each change done to the table being audited. The information is kept in this table on a per session commit basis, i.e. for each commit done in the user session. Some of the columns of interest are the following:
  • HISTORY_TABLE - The name of the table that was audited
  • FIELD_NAME - The name of the column with the HISTORY_TABLE that was audited
  • OPERATION - The operation on the column, i.e. INSERT, UPDATE, DELETE
  • VALUE_OLD - The original column data value
  • VALUE_NEW - The new column data value
Given the information in the HISTORY_LINE table we will be able to link to the corresponding history table (REGIONS_HISTORY, COUNTRIES_HISTORY, etc.) and be able to present a "picture" of what the data in the table looked like prior to the change. We can then compare it with the latest data in the corresponding table (REGIONS, COUNTRIES, etc.). Here an example of what the data in the HISTORY_LINE table might look like:

PL/SQL support

Historical audit trail information is created by calling two separate PL/SQL procedures called AUDIT_TABLE and AUDIT_DETAILS. These procedures have been implemented as part of the AUDIT_PKG in the database. AUDIT_TABLE is called to create the corresponding _HISTORY (REGIONS_HISTORY, COUNTRIES_HISTORY) table row while AUDIT_DETAILS is called to create the HISTORY and HISTORY_LINE rows. This is what the AUDIT_TABLE procedure looks like:


The code uses dynamic SQL to call the specific table audit procedures. The AUDIT_PKG package declares an array called tables_to_audit which defines the specific tables to audit. If the table is to be audited it must be added to this array. Here is its declaration for this example:

Part of this implementation requires that you provide the specific table audit procedures. These procedures are called dynamically by AUDIT_TABLE as mentioned above. The specific audit procedures must conform to the following naming format: AUDIT_table_name, where table_name is the table being audited. For the REGIONS table for instance, the procedure should be called AUDIT_REGIONS. Here is an example implementation of AUDIT_REGIONS:

The AUDIT_PKG.AUDIT_TABLE procedure will be called from the ADFBC layer to create an audit record for the specific table. The procedure is expecting the current session identifier, a commit identifier, the audit operation (INSERT, UPDATE, DELETE), the table name being audited and the table's primary key. Since the table's primary key is specified as a VARCHAR2 type, it will need to converted to this type if it is of different type. In this case also note the limitation of creating an audit trail for a table that uses a composite primary key. We will seen in part 2 of this post how this is done.

As mentioned earlier, the AUDIT_DETAILS procedure creates or locates the HISTORY record for the specific user session and uses dynamic SQL to create the individual HISTORY_LINE rows. It is shown below:


In this case you will also need to implement the specific audit details procedures to generate the HISTORY_LINE rows for the columns that were affected for each specific table. These procedures must conform to the following naming format since they are dynamically called: AUDIT_table_name_DETAILS, where table_name is the table being audited. Here is an example implementation of the AUDIT_REGIONS_DETAILS:

These procedures determine the differences between the original table (i.e. REGIONS) and the _HISTORY table (i.e. REGIONS_HISTORY) that have occurred for the specific commit session and produce the data in the HISTORY_LINE table.

The AUDIT_PKG.AUDIT_DETAILS procedure will be called from the ADFBC layer specifying the user's session identifier, the commit identifier and the user name. We will see this in the second part of this post.

Conclusion

We will conclude in the next part where we will see how to hook up this implementation to the ADFBC framework. We will do this in a generic way that will require minimal changes only to framework extension classes.

Until then, enjoy JDeveloping!

Tuesday, June 7, 2011

FAQ #35 - How to set default values for View object row attributes

Introduction

In this post we will see how to set default values to View object attributes. There are a number of places where you can do this:

  • In the overridden View object row create() method
  • Declaratively using a Groovy expression
  • In the attribute getter method

To demonstrate each case, consider the use case of setting the employee’s hire date to the current date for a newly created View object row.

Main Theme

Setting default attribute values in the overriden ViewImpl create()

To set the default value for a View object attribute in the overridden create() method, follow these steps:

  • Create a View Row custom Java implementation class for the Employees View object.
  • Open the EmployeesRowImpl.java custom View Row Java implementation class and override the create() method using the Override Methods… button – the green left arrow on the editor toolbar.
  • To set the default employee’s hire date to today’s date, add the following code to create() immediately after the call to super.create():
              // set the default hire date to today
             this.setHireDate((Date)Date.getCurrentDate());

Setting default attribute values with a Groovy expression

To set the attribute default value using a Groovy expression, follow these steps:
  • Open the Employees View object definition and go to the Attributes page.
  • Select the attribute that you want to initialize – HireDate in this case, and click on the Edit selected attribute(s) button (the pen icon).
  • On the Edit Attribute dialog select the View Attribute node.
  • Select Expression for the Value Type radio button in the Attribute section.
  • Enter the following Groovy expression in the Value field: adf.currentDate


Returning a default value from the attribute getter

Another way to set a default value for a View object attribute is in the attribute getter method. Follow these steps to set the default employee hire date:

  • Locate the View object attribute getter in the View object custom row implementation class. In this example is the getHireDate() method in EmployeesRowImpl.java.
  • Replace the existing code in getHireDate() with the following:

          // get the HireDate attribute value
          Date hireDate = (Date)getAttributeInternal(HIREDATE);
          // check for null and return today's date if needed
          return (hireDate == null) ? (Date)Date.getCurrentDate() : hireDate;

Note that using this technique we don’t actually set the attribute value; rather we return a default value, which can be subsequently applied to the attribute. Also notice that this is done only if the attribute does not already have a value (the check for null).

Actually setting an attribute value in a getter is not a recommended practice.

Attribute dependency

A common use case related to this topic is setting an attribute’s value based on the value of another related attribute. Consider for instance the use case where the employee’s commission should be set to a certain default value if the employee is part of the Sales department. Also consider the case where the employee’s commission should be cleared if the employee is not part of the Sales department. In addition to accomplishing this task with Groovy as stated earlier, it can also be implemented in the employee’s DepartmentId setter, i.e. in the setDepartmentId() method as it is shown below:

    public void setDepartmentId(Number value) {
        // set the department identifier
        setAttributeInternal(DEPARTMENTID, value);
        // set employee's commission based on employee's department
        try {
            // check for Sales department
            if (value != null && SALES_DEPARTMENT_ID == value.intValue()) {
                // if the commission has not been set yet
                if (this.getCommissionPct() == null) {
                    // set commission to default
                    this.setCommissionPct(new Number(DEFAULT_COMMISSION));
                }
            } else {
                // clear commission for non Sales department
                this.setCommissionPct(null);
            }
        } catch (SQLException e) {
            // log the exception
            LOGGER.severe(e);
        }
    }

Conclusion

As you can see, there are a number of different ways for initializing your View object row attributes. Which one you choose depends on the specific use case at hand. It is common on large projects that a combination of all (and more) is used. Setting a standard approach could be appropriate in this case.

Until the next time, keep on JDeveloping!

Monday, May 9, 2011

FAQ #34 - How to utilize WebLogic Work Managers for long-running ADF processes, Pt. 1

Introduction

The WebLogic Work Manager functionality along with its supporting Java API - CommonJ, can greatly improve performance for those long running processes in your ADF applications, especially for those notorious ones - you know, the one that cause "stuck" threads? This is true because these long running processes can now run asynchronously on a specific Work Manager that you define, one that is configured to ignore "stuck" threads. Let's take a look.


Main Theme

Adding and configuring a Work Manager in WebLogic

You define a Work Manager in WebLogic by selecting Work Managers under the Environment node in the Domain Structure window and clicking New on the Summary of Work Managers page on the right on the Global Work Managers, Request Classes and Constraints table.


On the Select Work Manager Definition type page select Work Manager and click Next.


On the Work Manager Properties page enter the name of the Work Manager and press Next.


On the Select deployment targets page select the Work Manager targets and click Finish to complete the creation of the Work Manager.


The Work Manager will now appear in the Summary of Work Managers table. Click on it to bring up the Configuration page. In it select Ignore Stuck Threads and click Save. This will configure the Work Manager to ignore "stuck" threads for long running processes. We won't be changing the other configuration settings for this Work Manager.


Configuring the Work Manager for your application

To configure the Work Manager for your application, edit the web.xml file and enter the following resource reference:

<resource-ref>
   <res-ref-name>wm/TestWorkManager</res-ref-name>
   <res-type>commonj.work.WorkManager</res-type>
   <res-auth>Container</res-auth>
   <res-sharing-scope>Shareable</res-sharing-scope>
</resource-ref>


This is necessary so that you will be able to access the Work Manager programmatically as it shown below.

Programmatically submitting works to the Work Manager


Here is an example of a long running process in an ADF application and a good candidate to produce a "stuck" thread:

    public void selectAll() {
          RowSetIterator iterator = getMyViewObject().createRowSetIterator(null);

          iterator.reset();
         
          // loop over 1,000,000 records...
          while (iterator.hasNext()) {
              MyViewObject myViewObject = (MyViewObject)iterator.next();
              myViewObject.setProcessed(true);
          }
          iterator.closeRowSetIterator();
    }


This is a method in the Application Module that loops over a large number of records - possibly millions - in order to set some boolean flag. Below we will re-write the code using the Work Manager Java API CommonJ.

First you will need to add support for the CommonJ API in your ADF application. The CommonJ API is located in the weblogic.jar library, so use the Libraries and Classpath option in the Project Properties and add it. The library can be found in the wlserver_10.3/server/lib directory in your WebLogic installation directory.


Now modify the method above to the following:

        public void selectAll() {
        try {
          //get Work Manager from local JNDI
          InitialContext ctx = new InitialContext();
          WorkManager workManager = (WorkManager)ctx.lookup("java:comp/env/wm/TestWorkManager");
          //create instance of Work and WorkListener implementations
          Work work = new SelectAllWorkImpl(getMyViewObject().createRowSetIterator(null));
          WorkListener workListener=new SelectAllWorkListener();
          //create work item for execution
          WorkItem workItem = workManager.schedule(work, workListener);
          //create list of WorkItems that we want to execute
          List workItemList=new ArrayList();
          workItemList.add(workItem);
          //run the work items in parallel; don't wait
          workManager.waitForAll(workItemList, WorkManager.IMMEDIATE);
          //check results; use only if you are blocking
          //SelectAllWorkImpl workImpl= (SelectAllWorkImpl)workItem.getResult();
        } catch (NamingException e) {
        } catch (WorkException e) {
        } catch (InterruptedException e) {
        }
    }


Conclusion

In this first installment of discovering Work Managers in WebLogic, we've seen how to create one and how to configure it and use it in your application. We will wrap up this topic on the next installment. There we will explain the code above and provide the implementations of Work and WorkListener interfaces. This is indeed a promising feature that should help in certain cases where long running processes can cause "stuck" threads.

Until the next time, keep on JDeveloping!


Tuesday, March 22, 2011

FAQ #33 - How to configure ADF diagnostics logging in WLS, Pt. 3

Introduction

In this third installment of posts related to the configuration of ADF diagnostics logging we will focus on the following topics: 1) how logs could be added programmatically to the diagnostics log, 2) how new Loggers could be added and configured to the diagnostics logging configuration and 3) how to dynamically configure the WebLogic diagnostics logging. This includes changing the logging levels for the configured loggers at run-time without the need to restart the server.


Main Theme

For some background information regarding diagnostics logging as it relates to ADF, JDeveloper and WebLogic refer to these earlier posts: FAQ #6 - How to fine tune ADF diagnostics logging in JDeveloper 11g R1  , FAQ #7 - How to configure ADF diagnostics logging in standalone WLS using JDeveloper 11g R1 and FAQ #8 - How to perform log analysis using the Diagnostic Log Analyzer in JDeveloper 11g . The main advantages of using Oracle Diagnostics Logging (ODL) when compared to other logging frameworks is its tight integration with WebLogic and JDeveloper. In WebLogic, the logs produced conform to and integrate with the diagnostics logging facility. Diagnostic logs include in addition to the message logged additional information such as the session and user that produced the log entry at run-time. This is essential when analyzing the logs. In JDeveloper the log configuration and analysis is integrated via the Oracle Diagnostics Logging Configuration and Oracle Diagnostics Log Analyzer respectively. Both are discussed in detail in the above referenced posts.

Programmatic Usage

Diagnostic logs can be generated programmatically from within your code by using the ADFLogger class. You simply instantiate an ADFLogger via the static createADFLogger() method and use its log() method. log() accepts a java.util.logging.Level parameter indicating the log level of the message that you are logging and it can be any of the ADFLogger.INTERNAL_ERROR, ADFLogger.ERROR, ADFLogger.WARNING, ADFLogger.NOTIFICATION and ADFLogger.TRACE. You can also use the severe(), warning(), info(), config(), fine(), finer() and finest() methods to do your logging. Here is an example:

// create the ADFLogger
private ADFLogger logger = ADFLogger.createADFLogger("package.class");
// log a trace
logger.log(ADFLogger.TRACE, "A trace log");


Configuration of Custom Loggers in JDeveloper

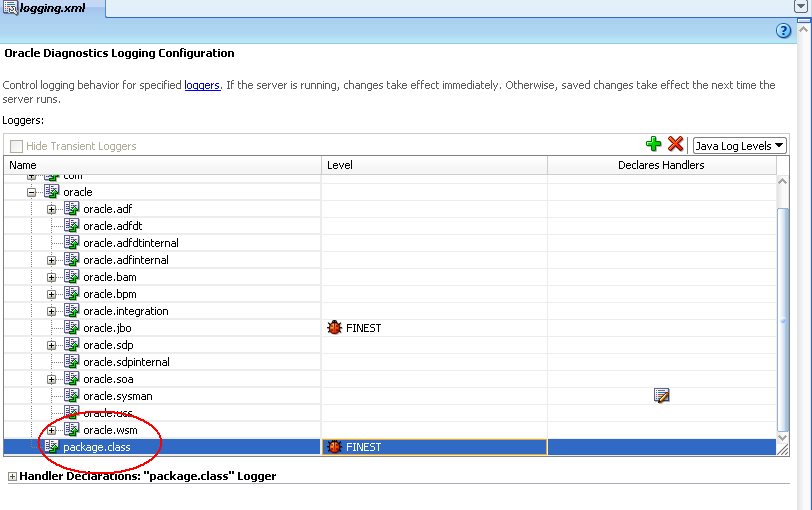
In the ADFLogger example above, "package.class" is a custom logger which is associated with the ADFLogger. You will need to configure this custom logger in the diagnostics logging configuration file logging.xml. Ensure that you load the appropriate logging.xml file for the WebLogic server you are configuring. The file can be found in the domain config\fmwconfig\servers directory for each server. So, open the appropriate logging.xml configuration file in JDeveloper and create a custom logger called "package.class" by clicking on the Add Logger icon as it shown below.

In the Add Persistent Logger dialog that is presented add the logger class specified above in the ADFLogger (i.e. package.class), set its logging level and click OK.


The custom logger will appear in the list of Loggers as it shown below. With its logging level set appropriately, your trace log in the earlier example will show in the diagnostics log.


Dynamic Configuration of Logging in WebLogic

Diagnostics logging can be configured dynamically in WebLogic via the wlst tool. Ensure that you run the wlst script located in the oracle common directory  - %MIDDLEWARE_HOME%\oracle_common\common\bin for a JDeveloper installation - and not the one under the WebLogic server home - %MIDDLEWARE_HOME%\wlserver_10.3\common\bin for the stand-alone WebLogic installed along with JDeveloper. The former provides custom commands for configuring diagnostics logging. First you will need to connect to the admin server via the connect() command as in connect('weblogic','weblogic1','t3://address:7001'). To change the logging level for the custom logger class above, use the setLogLevel() command as in setLogLevel(target="ManagedServer1", logger="package.class", level="ERROR"). Specify the target WebLogic server with the target= argument (ManagedServer1 in this example), the logger class with the logger= argument and the new logging level with the level= argument. It can be either a Java level or an ODL level. Some valid Java levels are: SEVERE, WARNING, INFO, CONFIG, FINE, FINER, or FINEST. Valid ODL levels include a message type followed by a colon and a message level. The valid ODL message types are: INCIDENT_ERROR, ERROR, WARNING, NOTIFICATION, TRACE, and UNKNOWN. The message level is represented by an integer value that qualifies the message type. Possible values are from 1 (highest severity) through 32 (lowest severity). Additional commands for dynamic configuration of the diagnostics log will allow you to configure the Log Handler for each logger class, display the currently configured loggers and so on. For more details, check out the documentation references sited below.


Conclusion

If you are considering a logging framework for an application to be deployed on WebLogic, I suggest that you take a closer look at the Oracle Diagnostics Logging facility. Its tight integration with JDeveloper (logging configuration and log analysis) and WebLogic (diagnostics log format, dynamic configuration) makes it a comparable choice.

Until the next time, keep on JDeveloping!


References

Logging Custom WLST Commands
Using Custom WLST Commands


Sunday, March 13, 2011

FAQ #32 - How to get started with JRockit Mission Control, Pt. 1

Introduction

JRockit Mission Control is a suite of tools that can be used to monitor, profile and manage the JRockit Java virtual machine. Among other, managing the JRockit Virtual Machine includes performing garbage collection on demand and eliminating memory leaks. JRockit is the virtual machine used in a production system by the WebLogic application server.


Main Theme

Installation of JRockit Mission Control

JRockit Mission Control must be installed on a client machine through which a target JRockit virtual machine running on a server machine can be monitored, profiled and managed. To download JRockit Mission Control, go to the JRockit Family Download page.

Accept the license agreement, select the appropriate version for your client operating system and proceed with the download. Once downloaded, start the installation by executing the file downloaded. Follow the installation wizard choosing in most cases the default options presented by the installer.


During the installation you will be given the option to install the JRockit JRE in the client machine. Select Yes (Install Public JRE) and click Next to proceed.


The installer will proceed with the installation of both the JRockit JRE and the JRockit Mission Control. Verify that the installation was successful and click Done.


Once installed, you can start the JRockit Mission Control by running the jrmc program in the target installation directory. When installed on a Microsoft Windows operating system a shortcut called Oracle JRockit Mission Control 4.0.1 is created under the Oracle JRockit JDK R28.1 for Java SE 6 with JRMC 4.0.1 (32-bit) group - for the version installed.


Before proceeding with Mission Control, you will have to configure the target JRockit Java virtual machine to allow its management via the Mission Control suite.


Configuration of target JRockit Java Virtual Machine

For the sake of this example, we will configure a WebLogic SOA deployment consisting of one administration server and two managed servers - one for SOA and another for BAM. Similar configuration steps can be taken to configure your own setup. Start by ensuring that your WebLogic is configured to run on the JRockit Java virtual machine. This should be the case in all production environments. To ensure that we are indeed using JRockit, we will manually set the JAVA_VENTOR parameter to Oracle in the setDomainEnv script.


We will also add a parameter called ENABLE_MNGMNT_CONSOLE in setDomainEnv to control whether JRockit is started to allow its management.

Thats all with the setDomainEnv script. We will proceed by adding a few lines in the startWebLogic script. Here we will check to see whether the management console is enabled and if it is we will check if the management console startup options are set. If there are none specified, we will specify some defaults. We will see below when configuring the managed servers that the management console start up options can be set in the startManagedWebLogic script. The lines that we will add to the startWebLogic script are:


As you can see in the above picture, we are starting the JRockit virtual machine with the -Xmanagement switch specifying no secure sockets, no authentication and 7091 as the default connection port. Each WebLogic server must be configured to allow Mission Control connections on a separate port.

We will conclude the configuration changes by adding the following lines to the startManagedWebLogic script:


What we have done here is configure a different JRockit management port for each managed server. In this case we need to make sure that the actual names of the managed servers are correct, so this needs to be adapted for your setup.

Now we can start the SOA domain. For each server, observe that the management options are set correctly.


Mission Control Connection Setup

Now that we have the target JRockit virtual machines configured to allow Mission Control management connections - remember that each WebLogic server runs on its own virtual machine, we can proceed by creating the connections to each virtual machine from within the Mission Control suite. To create a new connection, right-click on the Connectors node and select New Connection.


In the New Connection dialog specify the WebLogic server host name or IP address, the management connection port and the connection name. Click on the Test connection button to test the connection.


We will create a separate connection for each WebLogic administration and managed server configured for the SOA domain above. After creating all the connections the Mission Control suite should look like this:


To start a monitor session for each configured virtual machine, right-click on the appropriate connection  and select Start Console.


This will open a monitor console as it is shown below.


Additional monitor consoles can be opened by right-clicking on another connection and selecting Start Console. Each monitor session will be shown in a separate tab in Mission Control.


Conclusion

This concludes this first part of getting started with the JRockit Mission Control. In the next part we will look at some of the features of the Mission Control.

Until the next time, keep on JDeveloping!

Code

http://jdeveloperfaq.googlecode.com/files/JDeveloperFAQNo32.zip


Related Posts Plugin for WordPress, Blogger...